The Promesst-inspired area in Order of the Sinking Star is the Vault of the Beamcasters, reached by heading west from the Crossroads. To solve its beam puzzles, arrange gems and emitters so the Caver receives the ability he needs where the next action must happen. Remember that he cannot normally push and needs extra empty space to turn sideways.
There is no single move sequence for every Promesst beam puzzle. This guide covers the supported color effects and a practical way to identify the missing condition in a room. It does not assign an ability to the dark-blue beam, whose effect is not established here.
Recognize the Vault of the Beamcasters
The western world is a larger connected cave environment built around gems, emitters, and colored light. The Caver wears a mechanical gem vest, and gems power the beam emitters. Standing inside different beams provides different abilities.
That structure changes how you read a blocked passage. An obstacle may become manageable once an emitter covers the useful square, or once you can move into a beam intersection. A path that is inaccessible under ordinary movement is not necessarily permanently closed.
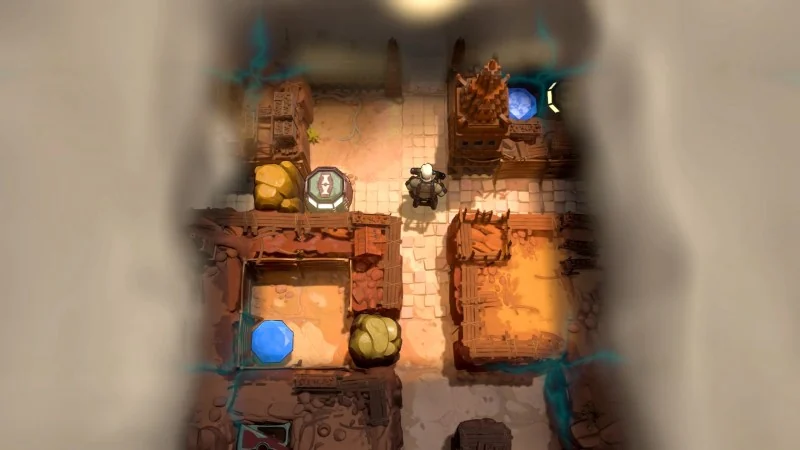
Before rearranging a room, inspect the current beam pattern and the obstacles along the route you want. Distinguish the objects that produce light from the places where the Caver can use the resulting ability. Moving toward a beam is preparation; using its effect to reach the next useful position is the actual route decision.
Match the beam color to the required action
The following effects are supported for the Caver in the western area. Use them as a reference while inspecting a puzzle, then pay attention to the exact beam coverage in your room.
| Beam color | Ability | What to inspect before acting |
|---|---|---|
| Yellow | Break objects | Whether the useful interaction occurs within the beam |
| Red | Disable red energy gates | Where you can gain the effect relative to the gate |
| Green | Walk through walls | The wall crossing and the space on the far side |
| Orange | Teleport over a tile, including across walls and obstacles | The landing space beyond the skipped tile |
| Cyan | Push things | Whether the Caver has pushing available at the required position |
| Violet | Move straight to the end of the beam | The endpoint and whether it is safe to reach |
Treat color as an explanation of what an action can do, not as a complete answer. The ability still has to be available in a useful arrangement. Seeing a green beam somewhere in the cave does not identify which wall to cross or how to arrive there with the necessary orientation.
Likewise, identifying a cyan beam explains how pushing becomes possible, but does not identify which object should move first. You still need access to the proper side and a destination that serves the route. The table narrows the kinds of actions to consider; the room geometry determines the sequence.
Check ordinary movement before changing the light
The Caver's bulky vest requires extra empty space to turn sideways. He cannot simply change direction in place. This means a route must account for orientation as well as the squares that appear open.
If you can enter a narrow space but cannot face the next direction, inspect the adjacent free space rather than immediately assuming that you need another beam. The current problem may be turning clearance. Solving that local movement issue can reveal that the existing beam arrangement already supplies what you need.
A useful planning method is to mark the next interaction mentally, then consider how the Caver can approach it facing the useful direction. Look for a wider position where a turn is possible before entering the constrained section. This is a way to read the movement rule, not a claim that every passage offers a particular turning tile.
Also remember the normal pushing limitation. Without the cyan effect, a block that another character could push is not an ordinary movable obstacle for the Caver. If a direct push fails, check the available ability before spending time on repeated approaches from the same side.
Plan one beam action from its useful position
Start with the obstacle closest to your immediate destination. Name the action you need: push a blocking object, break something, cross a wall, pass a red gate, or travel beyond a tile. Then locate the beam effect that permits that action.
- Inspect the obstacle and the position from which the action would occur.
- Find the emitter and gem arrangement associated with the useful beam.
- Compare the beam's current coverage with the position you need to occupy.
- Check whether the Caver can reach that position and turn as required.
- Try the action, then inspect the new position before making the next change.
These steps describe a decision process, not an exact room solution. Their purpose is to keep beam placement and character movement connected. An emitter adjustment that looks promising is only useful if the Caver can get to the place where its new coverage matters.
If the action succeeds but leaves you unable to continue, inspect the resulting destination. You may have solved the obstacle while removing access to the next needed effect. Undo to the last useful arrangement and plan the next condition before repeating the same crossing.
Use overlapping beams as a combined condition
When beams overlap, the Caver can gain several abilities at once. The intersection therefore matters as a distinct place in the room. Do not evaluate the light pattern only as separate corridors of individual colors.
List the effects you understand, then compare them with the actions the obstacle requires. If one effect gives access and another permits the necessary interaction, inspect where those effects overlap. The important position may be an intersection that initially looked like incidental lighting.
Avoid assigning unsupported extra effects to a mixture. Overlap provides multiple abilities; it is not a reason to invent a new color recipe or assume that every combination creates an additional power. Work with the effects you can identify and test the consequence from the current arrangement.
A helpful experiment changes the coverage while preserving the action you are trying to perform. If the same position works under an intersection but fails under one isolated beam, you have learned that more than one effect matters. Use that observation to plan a route rather than changing several emitters at once.
Understand what the emitter tools change
Two artifacts expand the ways you can manipulate the light pattern. The rod lets you force-push beam emitters. The torque lets you change the direction of emitted beams. Their effects address different parts of the arrangement: where an emitter stands and where its light travels.
| Artifact | Supported effect | Planning question |
|---|---|---|
| Rod | Force-push beam emitters | Would relocating the emitter cover the useful position? |
| Torque | Change emitted beam direction | Would redirecting the beam reach the relevant route? |
Once you have a relevant tool, reconsider an emitter that you previously treated as fixed. An inaccessible-looking action may become available through a change to the beam source rather than a different path for the Caver.
Keep the two manipulations distinct while experimenting. If you relocate and redirect an emitter in the same attempt, it becomes harder to see which change solved the coverage problem. Establish the effect you need, try the smallest supported adjustment, and examine whether it covers the required action position.
This guide does not provide artifact locations or claim that you have either tool when entering every room. Use the options actually present in your current state. A strategy involving the rod is irrelevant until the game has made that artifact available to you.
Read yellow, cyan, and red obstacles separately
Breaking, pushing, and disabling a gate solve different problems. If a room includes several kinds of obstruction, identify which one currently blocks access to the next useful square. Trying every color against the final exit can overlook the smaller obstacle that prevents you from reaching the appropriate beam first.
For a pushing problem, inspect both the required side of the object and the place it will occupy afterward. For a breaking problem, inspect what route becomes available after removing the object. For a red gate, consider the position where the red effect becomes relevant to the crossing.
These are geometric questions you can answer from the room, rather than assumed movement counts. Without the specific starting arrangement, a universal instruction such as “push twice, then turn” would be unreliable. Use the beam effect to identify the type of action, then solve its local access requirement.
Check orange and violet destinations before committing
Orange and violet both affect traversal, but their supported descriptions differ. Orange allows teleporting over a tile, including across walls and obstacles. Violet moves the Caver straight to the end of a beam. Do not treat them as interchangeable ways to reach any visible location.
For orange, compare the intervening tile with the landing place. The skipped obstruction is only part of the move; the destination must help you continue. For violet, inspect the end of the beam before using it. The effect can be dangerous when there is nothing appropriate at its endpoint.
If your intended destination is close to an emitter or intersection, inspect whether the traversal leaves you in the light you need next. A route can successfully pass an obstacle while depositing the Caver in a position that cannot support the following interaction.
Recover from a failed beam arrangement
Use undo after an experiment changes the room in an unhelpful way. Inspect the action that caused the first useful condition to disappear: an object blocking turning space, an emitter leaving a required line, or a traversal reaching an unusable destination.
Keep the observation even when you reverse the action. If the cyan beam allowed the push but the destination blocked movement, the ability was correct and the object arrangement needs attention. If the Caver never reached the right side, solve access before adjusting colors. If the endpoint of a violet move was wrong, revisit the beam direction or your choice of route.
The western world is connected and can feel less contained than an individual island puzzle. Choose a concrete next objective rather than trying to solve every visible obstruction simultaneously. Establish one usable route, inspect what it reveals, and return to earlier obstacles with the beam abilities and tools actually available in your current state.