In Order of the Sinking Star's longer puzzle areas, look for the small flaring effect on checkpoint tiles, especially at the landing point into the next section. The checkpoint region can cover more than one grid square, and an object can hide part of it. In Skipping Stones, inspect the opposite shore and the squares around a rock instead of looking only for a separate, obvious checkpoint object.
Once you reach a checkpoint, the reset-to-checkpoint command gives you a return state for that section. This guide explains how to identify that location and plan around it; it does not supply a complete coordinate list for every checkpoint in the game. Checkpoint recovery and preserving your campaign between sessions are separate uses of progress.
Look for a Flare on the Grid
A checkpoint can be visually modest. The useful cue is a small flare effect on the affected floor squares, rather than a large building, save station, or freestanding monument. Watch the square long enough to notice the effect before deciding that the next island has no checkpoint.
In the longer Skipping Stones areas, that cue can identify the place you are trying to land. Start by locating the flaring squares, then trace which neighboring positions let your character reach them. This gives your route a concrete destination before you begin arranging stones or moving between islands.
Do not identify every orange glint in the water as a checkpoint. Water highlights and surrounding visual details can also catch your attention. Confirm that the flare belongs to a reachable grid location and compare it with a checkpoint you already recognize nearby.
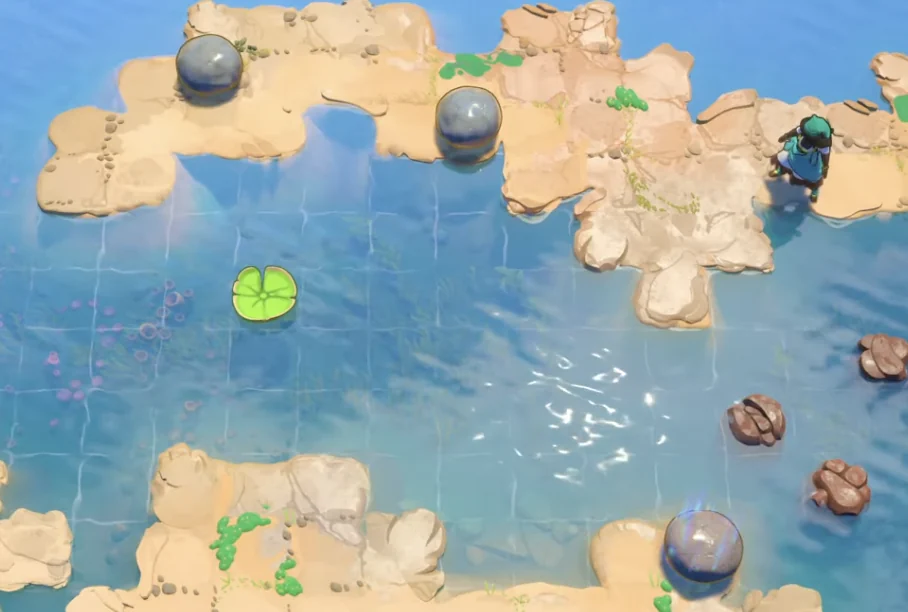
The checkpoint glow can be partly concealed by a rock. Inspect the nearby tiles before resetting.
Inspect More Than One Square
A checkpoint region is not necessarily a single tile. It can span several neighboring squares. That matters when a landing position looks slightly offset from the marker you noticed or when an object occupies part of the area.
Inspect the whole group of affected squares, including positions next to or underneath a movable rock. A rock can obscure a checkpoint location without removing the checkpoint from the room. Check the nearby ground rather than assuming the visible object is the only relevant feature there.
This is also why a close-up of one square can be misleading. A useful image includes the nearby shore, adjacent grid positions, and any object covering part of the region. That context lets you see the marker as an area instead of mistaking one visible fragment for the complete destination.
Search the Next Section's Landing Point
In connected Skipping Stones sequences, the checkpoint often belongs to the beginning of the next section. When you are trying to cross a gap, inspect the landing side first. A checkpoint there can indicate the point from which you will begin the next local problem.
This changes how you frame the immediate task. You may be looking for a route onto the marked landing squares rather than trying to reach every visible island or carry an object to the farthest possible screen. Establish the nearest relevant destination before building a plan around scenery beyond it.
When several checkpoints are visible, identify which one belongs to the section you are entering. Do not assume that the farthest marker must be the next goal simply because it lies toward the edge of the screen. Check the route, available resources, and the area you have already traversed.
Use a Broader View for Location
The PC controls include Local Area View on Q and Overhead View on Tab. Use the relevant view to inspect the surrounding route, then return to the grid-level layout for the final landing squares. For a controller, follow its displayed view prompts rather than substituting these keyboard keys.
The broader view helps you distinguish a checkpoint you can approach from a destination that belongs to a neighboring section. It is particularly useful when a room scrolls over several screens and the next landing area is easy to lose track of.
A useful way to remember the destination is to pair two landmarks: the flaring checkpoint region and a distinctive nearby object or shore shape. If you leave to inspect another screen, that pair helps you return without confusing it with a similar-looking island.
Check the Arrangement Before Stepping Onto It
The checkpoint represents an arrangement of the puzzle, not merely your character's approximate location. Before entering it, take a moment to inspect where the movable objects and any other controllable characters are positioned.
In a room with multiple characters, positioning another character before entering the checkpoint can make later retries more convenient. Instead of repeating an avoidable setup after every return, you begin from the arrangement you prepared. Only use this when the room's legal moves allow it; do not force a secondary character toward a marker at the cost of blocking the route.
Likewise, inspect a stone you have carried across from the previous section. Its location when you trigger the checkpoint can matter to the state you return to. If you push it into an inaccessible position and then continue, a reset to the latest checkpoint may return you to that same inconvenient arrangement.
Confirm Which State Reset Restores
If you need to return to a checkpoint, use the reset-to-checkpoint command and inspect the resulting location and objects. Compare them with the arrangement you remember when you reached the marker. That tells you which state the command is restoring in this section.
Do not use “the checkpoint” as a vague label if you have crossed several markers. The latest state may be different from the landing point you first noticed. A return to an unexpected square can mean that you reached another checkpoint without recognizing its flare.
If the character returns close to a rock that remains awkwardly positioned, examine whether that rock was already there when you triggered the checkpoint. Resetting the section cannot be assumed to undo every earlier setup in the connected area.
Know That Undo Can Cross a Checkpoint
Reaching a checkpoint does not always mean that the earlier move history has become inaccessible. In the connected Skipping Stones sequence, undo can go back past the checkpoint, and doing so also undoes the checkpoint itself.
This is useful when the arrangement just before entering the marker was the problem. You can investigate the earlier state instead of assuming that the only option is to repeat the latest checkpoint arrangement. Keep the scope clear: undoing the checkpoint changes that checkpoint state as well as the move sequence.
It is also different from requesting a reset to the checkpoint. One command takes you to the recorded checkpoint arrangement; undo follows the move history backward and can remove the marker activation you just passed. Use the command that matches the state you actually want to inspect.
Before a long series of undos, note the current marker and the arrangement you are leaving behind. That makes it easier to understand the change if your next reset returns to an earlier point. The mechanics of correction matter to checkpoint location because the active checkpoint can change as you rewind.
Avoid Mistaking a Portal for the Marker
A star or portal at a puzzle entrance helps identify the challenge you enter. A small flaring checkpoint region identifies a return state within a connected puzzle sequence. Those landmarks can both be useful without serving the same function.
If your immediate problem is locating a reset destination, search the connected room's grid for the flare and inspect the state restored by the checkpoint command. If your problem is relocating the room itself, record its entrance and distinctive layout. Choosing the correct landmark prevents a long search around the wrong kind of symbol.